

Wednesday, 31 July 2013


Sunday, 28 July 2013
New Store: Sylvie and Shimmy
In need of one of a kind fashion, shoes, or accessories? Enjoy supporting small and local businesses? Look no further than Sylvie and Shimmy in Toronto's equally as unique and antique hunter friendly Parkdale Village. Styleground was lucky enough to attend the grand opening on June 1st 2013 and boy were we blown away.

Their website states that they attempt to create "...an atmosphere of ones dream closet... transcend a comfortable and cozy shop where patrons will hang out and provide an interactive environment", and boy do they hit the nail right on the head. Their decor is mainly a collection of thrifted gold and genuine antiques from Caroline Sylvester (Sylvie)'s very own grandmother.
From the moment you walk in, you're enveloped in floral, lace, and you'll exclaim "cute!!" more than you ever have before, I guarantee it!


The items they carry are a combination of handpicked items from local designers, and shipments from Korea. The prices are all very affordable and absolutely worth supporting young creative talent. One of the great things about this store is that they also turn you onto other local businesses' (who's products they carry), such as the trendy MoonRox for jewelry, and the adorable graphic tees from Crywolf. Both very unique, both home grown, and both just a taste of what Sylvie and Shimmy have to offer.


And have we mentioned how ridiculously cute the tags are??


We've visited Sylvie & Shimmy on numerous occasions and will show our purchases on a separate post. Stay tuned! :)

xx
Raghda & Mila
Styleground

Their website states that they attempt to create "...an atmosphere of ones dream closet... transcend a comfortable and cozy shop where patrons will hang out and provide an interactive environment", and boy do they hit the nail right on the head. Their decor is mainly a collection of thrifted gold and genuine antiques from Caroline Sylvester (Sylvie)'s very own grandmother.
From the moment you walk in, you're enveloped in floral, lace, and you'll exclaim "cute!!" more than you ever have before, I guarantee it!


1640 Queen St W
Toronto, Ontario
(647) 348-3332
xx
Raghda & Mila
Styleground
NEW LAYOUT, NEW YEAR!
Hello lovelies!! We've missed you!!
Its been a long while, hasn't it?! Not to worry, Styleground is back with a fresh new layout and fresh new ideas!
We're excited to share our growth in style, catch you all up on our take of fashion/beauty news, and continue to share our experiences!
We hope to have you along for the ride :)
xx
Raghda & Mila
Its been a long while, hasn't it?! Not to worry, Styleground is back with a fresh new layout and fresh new ideas!
We're excited to share our growth in style, catch you all up on our take of fashion/beauty news, and continue to share our experiences!
We hope to have you along for the ride :)
xx
Raghda & Mila
Saturday, 7 July 2012
Plumful lipstick by MAC
Purchased last week, Plumful is a great addition to my lipstick collection. It's incredibly sheer so I had to layer in on to get this pigmentation, though the plus side is that it's also really moisturizing and glossy.
Xx Raghda
Xx Raghda
Friday, 22 June 2012
OOTD ~ My First
This'll be my first OOTD. I just thought I did a good job with the pinks :) This was for school, by the way. Everything's from H&M except for the shoes which is from Spring or CallItSpring, however you wanna call it. And the ring's from a store in P-Mall. Reminded me of the Mother of Dragons from Game of Thrones.


Holika Holika
Yo! I found this new place that just opened up in P-Mall and I'm totally in love with it. It's a Korean made cosmetics company called Holika Holika. This is what I got.
I got more, obviously, but I was too lazy to take pics of 'em. Google 'em if you'd like. My sister brought to my attention a site where you can get these for cheaper but this site doesn't have all the items, like this lipstick.
http://cosmetic-love.com/
M.
 |
| Heartful Moister Lipstick in RD808 Kissing Red |
 |
http://cosmetic-love.com/
M.
OOTD: Heatwave!
Heya guys, Raghda here and boy has it been hot in Toronto! To deal with the heat, keeping your hair up and away from your face is a must, so I went with a qt sockbun. (though I can never do away with my bangs!!) Some comfy DIY shorts are a major plus, I used a tutorial from andrea's choice rainbow shorts video.
Now one thing I couldn't decide on was if I should go with the much more practical vest


Now one thing I couldn't decide on was if I should go with the much more practical vest

or tucked in lightweight flannel

never tuck my shirts into pants or shorts, so I was surprised by how cute it looked and decided on the shirt. If I get heat stroke, at least I'll look cute! haha
Do you ever sacrifice comfort for fashion?
xxRaghda
Monday, 18 June 2012
Nails ~ Floral Nail Stickers
I've been meaning to try this new trend of sticking lacquer strips on your nails instead of painting them. I've seen some friends and gurus try this out and their nails were to die for.
The ones I used were TrendTips Real Lacquer Strips Sephora By OPI in SE637 Floral.


Turns out my nail shape/size is wonky 'cuz none of the strips fit my nails perfectly - they were either too big or too small. I merely skimmed through the instructions and went straight to the sticking. Whatever was on my skin I tried to get off by scratching at it or filing it (which wasn't good for the skin). Stupid little me didn't realize that nail polish remover would've worked better :P I top coated it with Seche Vite and finito!!
This was really fun to do and it looks amazing so Imma do this again with other patterns and I'll also try other (and cheaper) brands to see the quality difference.
<3
M.
Edit: These were b**** to take off. The package said use ordinary nail polish remover but there was so much residue left over the sticky part of the stickers. I never used a base coat and only a top coat so let's try it with a base coat and no top coat :D
The ones I used were TrendTips Real Lacquer Strips Sephora By OPI in SE637 Floral.


Turns out my nail shape/size is wonky 'cuz none of the strips fit my nails perfectly - they were either too big or too small. I merely skimmed through the instructions and went straight to the sticking. Whatever was on my skin I tried to get off by scratching at it or filing it (which wasn't good for the skin). Stupid little me didn't realize that nail polish remover would've worked better :P I top coated it with Seche Vite and finito!!
This was really fun to do and it looks amazing so Imma do this again with other patterns and I'll also try other (and cheaper) brands to see the quality difference.
<3
M.
Edit: These were b**** to take off. The package said use ordinary nail polish remover but there was so much residue left over the sticky part of the stickers. I never used a base coat and only a top coat so let's try it with a base coat and no top coat :D
Sunday, 17 June 2012
Nails of the day
A bit messy, but F21's Love & Beauty in Mint with Essie's Navigate Her on the pinky.


Colourful nails and colourful jammies, happy Sunday!

Friday, 15 June 2012
DIY: Summer Dress
Hey guys, Raghda again with another DIY! This one is a bit more complicated then the last one, and it requires either a body form/ seamstress mannequin, or constant fittings since you'll be making your own custom pattern. I recommend trying this out if you know your way around a sewing machine or if you're just feeling particularly brave.
You will need:
Muslin (cheap fabric, about 3 yards)
about 3 yards of fabric of choice
elastic thread
loads of pins
measuring tape
body form (optional, recommended)
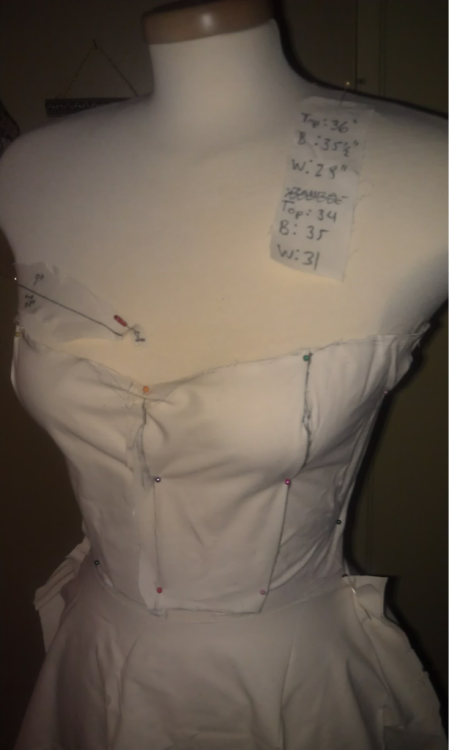
So I decided that I wanted to make my sister a dress with a sweetheart neckline and circle skirt for her vacation. Easy peasy, no zips or buttons, but stretchy back panel to get in and out.
Bodice:
The first step would be getting measurements. With this, all I needed were bust (measure all around from largest point), waist (smallest part of body), area just above bust (where top of dress would hit), and measurement of right under arm to waist (length of bodice).
At this point, cut long rectangular panels and begin pinning and cutting and cinching and folding and pinning and pinning your muslin to your body form. when you have the rough shape you're looking for, go back to your original measurements and be sure that the length of the bodice is similar.
*Always leave at least an inch of extra fabric at ends of fabric so that you can pin and sew pieces together.
*Try your best to keep your pieces symmetrical. the back panel should fold in half perfectly, the front panels should be mirror images.
Skirt:
This is my take on a circle skirt. Take the waist measurement and divide it by 4, take fabric and fold it in half and in half again. Take your new measurement and measure a quarter circle from the folded corner and that will be the waist. While the fabric is still folded, round off and cut off the ends and the new waist. This waist will look too big, this is where elastic thread will come in.
Sewing:
Wind elastic thread around bobbin by hand and sew half inch lines across entire back panel of the bodice. Sew with elastic thread across waist of skirt. With regular thread, sew together bodice and do a fitting while the skirt and bodice are still separated with bodice and skirt inside out. Pin bodice to skirt, evenly spacing out fabric that elastic waistband has brought together. Sew top to skirt, hem and trim everything that needs to be hemmed and trimmed and do another fitting for skirt length, remove as much as you'd like.

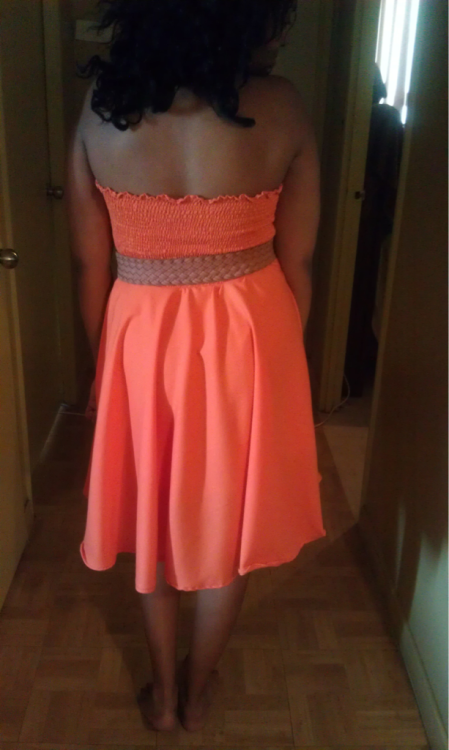


Throw on a belt and enjoy!
<3
What's your favourite thing to DIY? Let us know below!
-Raghda
Thursday, 31 May 2012
How To: Cut Oversized Tees
Hey guys, Raghda here!
If you're anything like me, you love band tee's but you hate the standard crew neck and sleeves of AA t-shirts? Love that grungy loose fitted DIY looking spring/summer shirt trend?


Well now you have the freedom of buying an inexpensive oversized shirt with an image you love, and recreating this style yourself! I cannot begin to tell you about the amount of shirts in my wardrobe that I've cut in this style. Not only is the larger neckline more comfortable, but the lack of sleeves also makes it less bulky when you pair it with a cute cardi or button up. With these easy to follow steps, you'll be cutting up your shirts in no time!

You Will Need:
Shirt (at least 2 sizes too big)
Scissors, preferably fabric shears
Bandeau (to wear underneath, large armhole will expose bra!)
Step 1: Lay your shirt out onto a (relatively) flat surface and try to smooth it out and get the seams on both sides lined up and even.

Step 2: First we will be cutting off the sleeves. You'll want to cut on the side of the seam closer to the shirt.
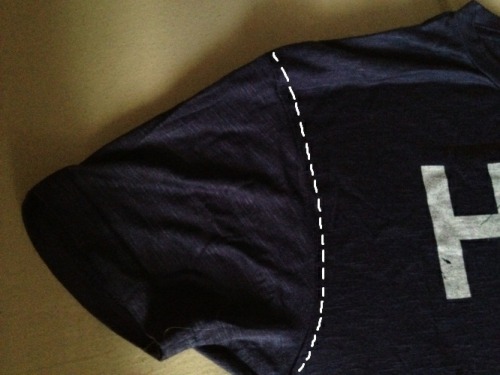
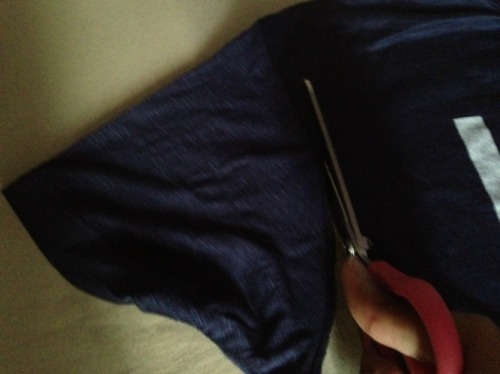
Step 3: Cut the collar along the inside of the seam as well. Use the front collar as a guide.
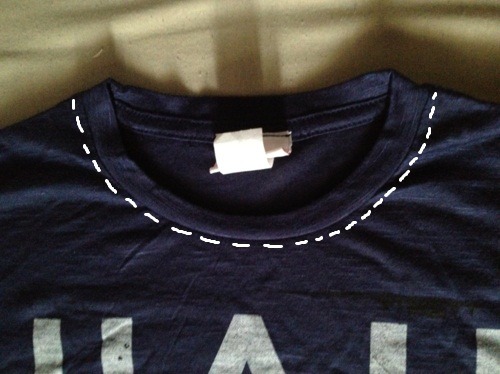

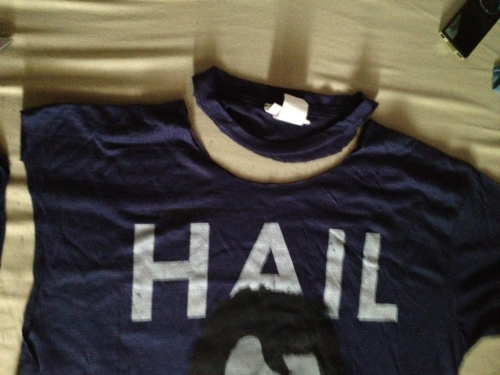
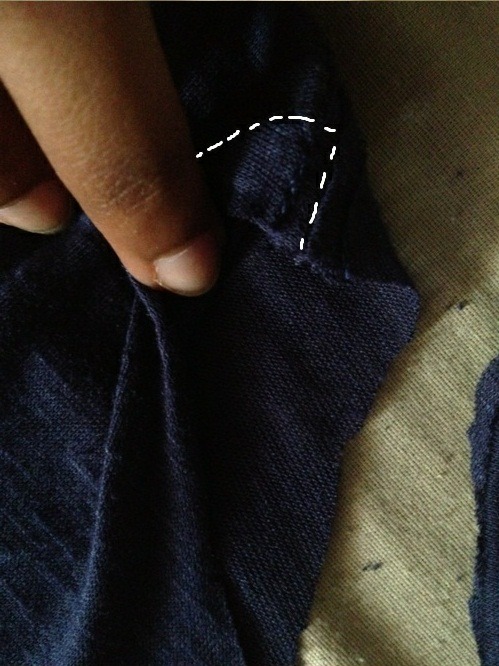
Step 4: Now you'll want to cut a little (roughly an inch) along the shoulder seam from the collar you've created, and down along the front of the shirt creating a larger neckline. It is important to only cut the neckline of the front of the shirt first because it will be much lower and wider then the back.
When you cut the neckline of the back, instead of enlarging it, you'll want to cut off the extra piece of fabric now at the shoulder seam and smooth it out into the back neckline.
You can always go back and cut a little more if you like, but you can never add fabric!! Go a little at a time

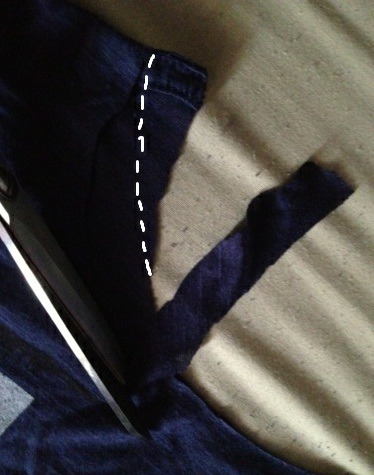
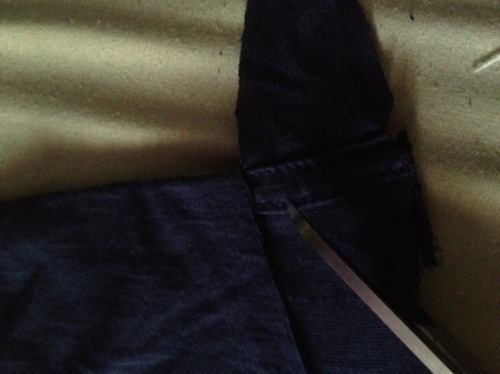

Step 5: Almost done! Now we're just going to cut off the bottom hem. At this point you can decide the length of the shirt (when cutting a cropped top, cut a little at a time and keep trying it on), I'm just keeping it fairly long. Keep in mind that this step is optional. If you do decide to cut the hem, the next step and any washing after will cause the hem to roll up a little.
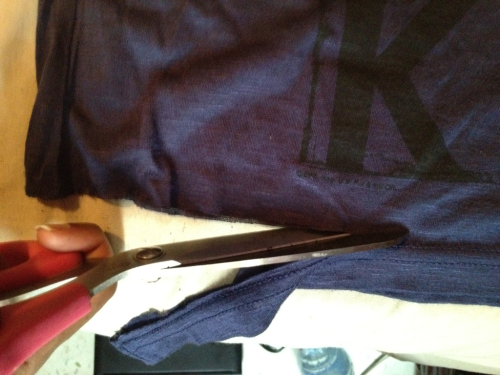
Step 6: Stretch. Just tug at the neckline, armholes and bottom of shirt, this helps the edges look a little less raw.
Step 7: Try it on and enjoy!
If you feel the need to make the armholes a little longer, cut more of the shoulder to give it a tank top look, or make the neckline a little wider, this is the time to adjust.
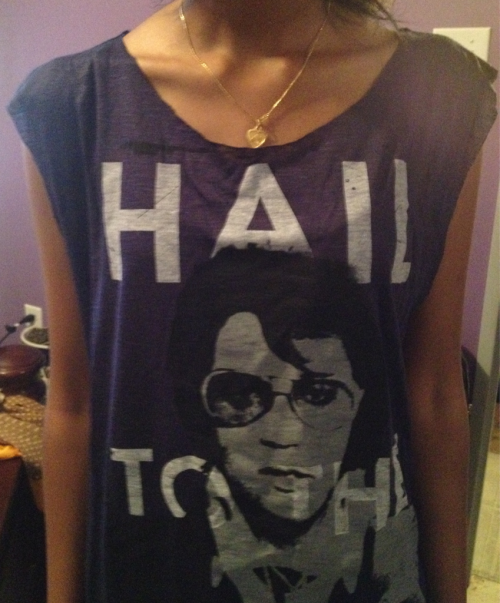

We'd love to hear if you've given it a whirl and how it goes! If you have any trouble, leave us a comment below.
Good luck and happy DIYing <3
-Raghda
Subscribe to:
Posts (Atom)